The Experiment:
NA62 is attempting to measure the branching ratio of the positive Kaon to positive Pion plus neutrino/anti-neutrino pair decay (meaning that the positive Kaon turns into a positive Pion and a neutrino/anti-neutrino pair). A branching ratio essentially tells us the frequency with which such a decay will occur. These can be measured or predicted by the standard model. For the Kaon decay NA62 is looking at, the branching ratio is about one in ten billion. This means that, one in every ten billion decays of a positive Kaon particle will produce a positive Pion and a neutrino/anti-neutrino pair, very rare.
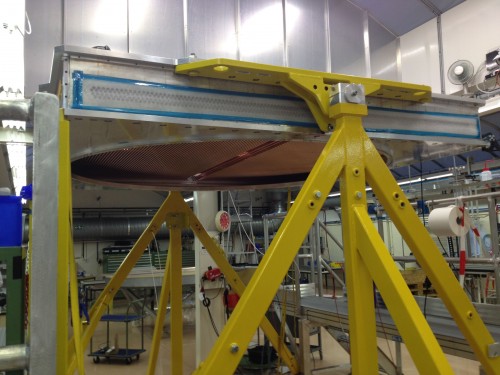
The experiment consists of 8 modules, each module has 224 straws, half of which run perpendicular to the other half. The modules look like this:

There will be 8 of the these modules lined up along the beam line, each one represents an individual tracker. The straws in each module, that’s 224 straws, represents both an X and a Y coordinate. One set of 112, is aligned in the way shown in the picture and the other 112 are aligned perpendicularly, above the first set. This arrangement allows for the X-Y plane to be drawn, which is important for performing track reconstruction on the incoming particles.
The detector, as I’ve said, has 8 modules, but each 2 modules creates a view, so the detector has a total of 4 views. This is to provide more robust and accurate data; each view consists of 2 modules rotated forty five degrees from one another. So if one module represents X-Y then the rotated module represents a new set of coordinates, called U-V. With another set of coordinates, we can achieve much more accurate measurements of the particles position and therefore our track reconstruction becomes considerably more accurate.
The detector is of the gaseous breed; we use an Argon/CO2 mixture with a high voltage tungsten wire running down the center of each straw. In general, charged particle will enter the gas region of the straw; this will cause electrons to be knocked off in a statistical pattern. The wire running down the straw is set at a certain voltage (with the edge of the straw set to ground), so the electrons will accelerate under the incident electric field. This acceleration will cause more electrons to be knocked off, causing an electron cascade. This will then be read off by the electronics connected to the center wire.
Each straw then represents either an X or a Y coordinate (depending upon the orientation of the chamber relative to the path of the particle). Since the straws in the X direction are going to be in front of the straws in the Y direction, any particle that enters an X straw will also, inevitably, also hit a Y straw, thus giving us our X,Y position. The same logic holds true for the U-V set of coordinates.
That’s the gist of the experiment; there are, of course, many more intricacies that I haven’t relayed in this post. Below you’ll find a link to more documentation and my email address if you have any further questions.
My Contribution:
So up until now, I’ve been explaining the whole of the NA62 experiment, but I haven’t mentioned what my actual contribution is. I have been working with the prototype of the NA62 straw tracker (the modules) and of an independent tracker called the MicroMegas detector.
- Straw Prototype:
A prototype of the main detector; using the same technology and principles.
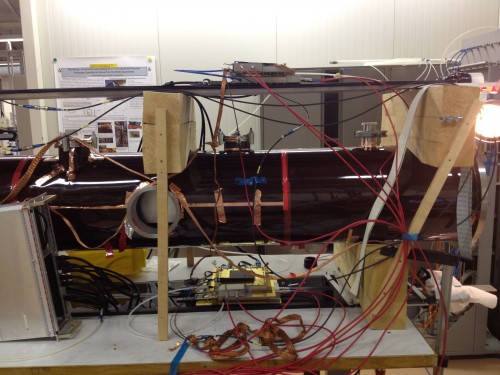
Here’s the prototype:

The straws in the prototype run parallel to that length of it, each one also filled with the aforementioned Ar/CO2 gas mixture. The straws in this prototype operate exactly like the straws in the main detector. Each one has a wire running through which reads off the electron cascades, giving us a coordinate. Although we do want to test this prototype, the physics behind it are fairly well understood (the creation and implementation of the software is where all the work went into the prototype).
However, we have the MicroMegas independent tracker:
- MicroMegas Detector:
The MicroMegas (herein, MM) is a detector that operates completely outside of the prototype straw detector. It has two stations each comprised of two chambers; the stations sit on either side of the prototype (in the picture above you can see them below and above the cylinder). Each chamber consists of four major components: the stainless steel drift, the gas chamber, the mesh and the read-out strips. The drift is set to a certain potential (-900V) and the mesh is set to a different potential (-500V); in between these is the gas chamber. So, like in the straw detector, the particle enters the gas chamber and knocks off some electrons. These electrons are accelerated toward the mesh. The mesh, being permeable, allows the electrons to pass through into the another gas region, but this region is tiny compared to the main gas chamber, but the potential difference (since the strips are at ground) is 500 volts. This causes a fairly large electric field which massively accelerates the electrons, again causing an electron cascade. These electron cascades (as there are multiple for each particle) are then read off by the electronics (the strips).
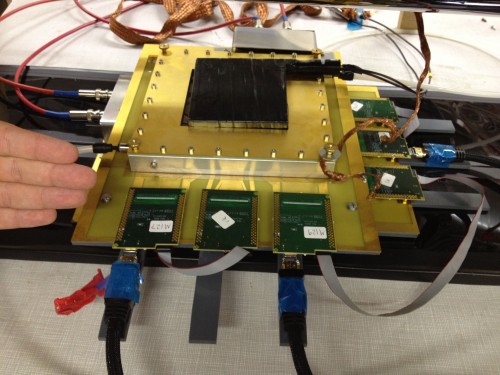
Here’s one chamber:

The description I gave works best if you visualize the chamber in the transverse direction; that is to say not top down but rather a side-on view.
At this point, some of you may be wondering how we know to collect data. We can’t see the particles. Even if we could, they’re traveling at close to the speed of light, so every time we’d notice one, the particle would be halfway across the world before we could hit the button to try to record it. So we need something that can automatically trigger the data collection when it senses a particle, and it has to do it fast.
The black box you see on top of the chamber is the solution, it is called a scintillator and essentially what it does is wait for a particle and when one enters it, it emits an amount of light. That light is then read into a bunch of electronics which tell the computer to start collecting data and all of this happens before the particle enters the gas chamber (which is directly below the scintillator). We call this process the trigger (since it triggers the data collection).
Each MM chamber is either an X or a Y coordinate, depending upon it’s orientation, the green boards in the picture are oriented parallel to the strips, when a strip is hit, it reads out and that would be considered an X or a Y. Then the particle enters the second chamber (below the first) which is oriented 90 degrees from the first chamber. The same thing happens and we get our Y coordinate. Putting these together, we have an X-Y plane with the coordinate of the particle. Two of the chambers, separated by a meter or so will give us two X-Y planes. So, we have a particle that hits the top two chambers (producing an X-Y coordinate) and then the bottom two (another X-Y coordinate) and a separation distance. We can use this information to recreate the track the particle took. It is possible for a particle to hit the first station and miss the second, but in the lab we used cosmic rays (charge particles from space) which, for the most part, are relatively orthogonal to the planet’s surface.
- Software:
For both the MicroMegas and for the Straw Prototype, we had the daunting task of developing the software that takes the collected data and expresses it in a form that we can actually use. This entailed decoding the data so that instead of having just counts of electrons (since that’s really all we get), we have things like millimeters or charge units. We have to take the raw data and turn it into something useful. Then we take that data, calibrate the the chambers (essentially find out how the software reads some of the dimensions of the chambers) and perform track reconstruction. This means that we construct the path the particle takes to travel through the detectors. All the software is written in C++ and ROOT.
Test Beam:
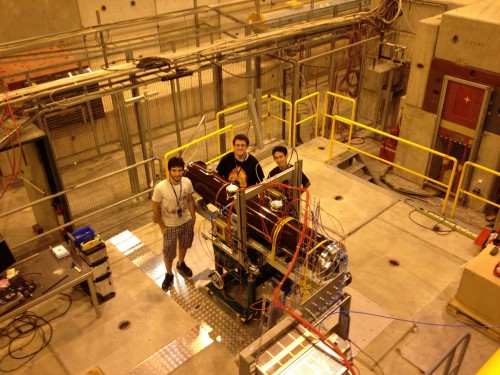
In order to test the prototype more effectively, we ran the detector in the test beam and collected data from there. Here is our prototype set-up in the test beam area:

The test beam is a particle (hadron) beam which we have some control over and runs at 120 GeV. This beam is taken from the SPS (Super Proton Synchrotron). Having the beam is incredibly useful because it allows us to get hundreds of events in mere seconds whereas when using the cosmic rays, we’d have to collect data for days in order to get a couple of thousands of events. Also, with the beam, we get particles streaming into the chamber that are collimated (meaning the beams of particles are parallel) which allows our software to be more accurate and thus our results are considerably more robust.
Once we’ve tested the detectors, our software will become apart of the full NA62 software package and will run alongside many of the other pieces of software produced for the main experiment. If you wish to know any more about the experiment, you can go here and you’ll find more documentation or you can ask me directly at redcoat@bu.edu.
-Bertie Wright